3 Hacks for Firefox That Will Double Your Internet Browsing Speed

There are many people out there complaining about the Firefox RAM Memory Bug. Lets get it straight. It’s not a bug. It’s part of the cache feature. This ‘feature’ is how the pages are cached in a tabbed environment.
To improve performance when navigating (studies show that 39% of all page navigations are renavigations to pages visited less than 10 pages ago, usually using the back button), Firefox implements a Back-Forward cache that retains the rendered document for the last five session history entries for each tab.
This is a lot of data. If you have a lot of tabs, Firefox’s RAM memory usage can climb dramatically. It’s a trade-off. What you get out of it is faster performance as you navigate the web.
Now a lot of us have found the ’secrets’ on how to manipulate settings in “about:config” to drop the memory usage as long as possible and to increase the speed at which Firefox loads sites. Read on to find out how to do this.
Remember: Firefox (download it here) is the best internet browser available (in my opinion), and these tweaks below will make it even greater and faster. So enjoy!

Reduce the amount of RAM Firefox uses for it’s cache feature

Here’s how to do it:
1. Type “about:config” (no quotes) in the adress bar in the browser.
2. Find “browser.sessionhistory.max_total_viewer
3. Set it’s value to “0“;(Zero)

Increase the Speed in Which Firefox loads pages

1. Type “about:config” into the address bar and hit Enter.
(Normally the browser will make one request to a web page at a time. When you enable pipeliningit will make several at once, which really speeds up page loading.)
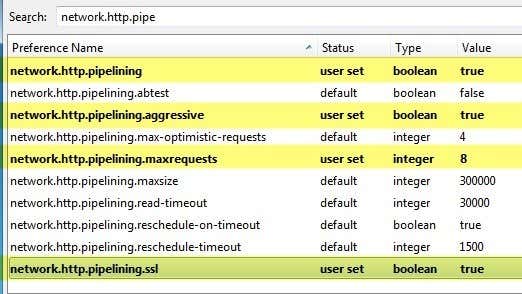
2. Alter the entries as follows:
Set “network.http.pipelining” to “true
Set “network.http.proxy.pipelining” to “true
Set “network.http.pipelining.maxrequests” to some number like 10.
This means it will make 10 requests at once.
3. Lastly, right-click anywhere and select New-> Integer. Name it “nglayout.initialpaint.delay” and set its value to “0“;.(Zero)
This value is the amount of time the browser waits before it acts on information it receives. If you’re using a broadband connection you’ll load pages faster now.
Optionally (for even faster web browsing) here are some more options for your about:config (you might have to create some of these entries by Right Click –> New– > Interger or String
network.dns.disableIPv6: set “false” 
content.notify.backoffcount”: set “5“; (Five)
plugin.expose_full_path”: set “true”.
ui.submenuDelay”: set “0; (zero)

Reduce RAM usage to 10mb when Firefox is minimized:

This little hack will drop Firefox’s RAM usage down to 10 Mb when minimized:
1. Open Firefox and go to the Address Bar. Type in about:config and then press Enter.
2. Right Click in the page and select New -> Boolean.
3. In the box that pops up enter “config.trim_on_minimize”. Press Enter.
4. Now select True and then press Enter.
5. Restart Firefox.
These simple tweaks will make your web browsing with Mozilla Firefox 2-3 times faster and easier. And I think they are fairly easy to apply. Enjoy!

11 Tricks to Increase Firefox speed 10 times

Hi friends, today i will share with you 11 tricks to increase Firefox browsing and normal speed 10 to 30 times. These are 100% tested hacks and improves the browsing speed of Firefox at least 10 times. These tricks are basically the latest tweaks found by several computer experts including me. These are isoftdl special tricks that boost your Mozilla Firefox browsing speed by 10-30 times.

howt to speed up firefox, increase browsing speed, firefox tips and tricks

11 Tricks to Increase Firefox Speed

1. Type about:config in the address bar and then press Enter.

2. In the filter search bar type network.http.pipelining. Be sure the value field is set true,if not double-click to set true. HTTP is the application-layer protocol that most web pages are transferred with. In HTTP 1.1, multiple requests can be sent before any responses are received. This is known as pipelining. Pipelining reduces page loading times, but not all servers support it.

3. Go back to the filter search bar and type network.http.pipelining.maxrequests. Double-click this option and set its value to 8.

4. In the filter search bar and type network.http.proxy.pipelining. Once opened doubleclick on it and set it to true.

5. In IPv6-capable DNS servers, an IPv4 address may be returned when an IPv6 address is requested. It is possible for Mozilla to recover from this misinformation, but a significant delay is introduced.
Type network.dns.disableIPv6 in the filter search bar and set this option to true by double clicking on it.

6. CONTENT INTERRUPT PARSING
This preference controls if the application will interrupt parsing a page to respond to UI events. It does not exist by default. Right-click (Apple users ctrl-click) anywhere in the about:config window, select New and then Boolean from the pop-up menu. Then:
A. Enter content.interrupt.parsing in the New boolean value pop-up window and click OK
B. When prompted to choose the value for the new boolean, select true and click OK.

7. Rather than wait until a page has completely downloaded to display it to the user, Mozilla applications will regularly render what has been received to that point. This option controls the maximum amount of time the application will be unresponsive while rendering pages. Right-click (Apple users ctrl-click) anywhere in the about:config window, select New and then Integer from the pop-up menu.
A. Enter content.max.tokenizing.time in the New integer value pop-up window and click OK
B. You will be prompted to enter a value. Enter 2250000 and click OK.

8. CONTENT NOTIFY INTERVAL
This option sets the minimum amount of time to wait between re flows. Right-click (Apple users ctrl-click) anywhere in the about:config window, select New and then Integer from the pop-up menu.
A. Type content.notify.interval in the New integer value pop-up window and click OK.
B. You will be prompted to enter a value. Enter 750000 and click OK.

9. CONTENT NOTIFY ON TIMER
A. This option sets if to re-flow pages at an interval any higher than that specified by content.notify.interval. Right-click (Apple users ctrl-click) anywhere in the about:config window and select New and then Boolean from the pop-up menu.
B. Type content.notify.ontimer in the New boolean value pop-up window and click OK.
C. You will be prompted to choose the value for the new boolean. Select true and click OK.

10. Notify Backoffcount
This option controls the maximum number of times the content will do timer-based reflows. After this number has been reached, the page will only reflow once it is finished downloading. Right-click (Apple users ctrl-click) anywhere in the about:config window and select New and then Integer from the pop-up menu.
A. Enter content.notify.backoffcount in the New integer value pop-up window and click OK.
B. You will be prompted to enter a value. Enter 5 and click OK.

11. CONTENT SWITCH THRESHOLD
You can interact with a loading page when content.interrupt.parsing is set to true. When a page is loading, the application has two modes: a high frequency interrupt mode and a low frequency interrupt mode. The first one interrupts the parser more frequently to allow for greater UI responsiveness during page load.
The low frequency interrupt mode interrupts the parser less frequently to allow for quicker page load. The application enters high frequency interrupt mode when you move the mouse or type on the keyboard and switch back to low frequency mode when you had no activity for a certain amount of time. This preference controls that amount of time. Right-click (Apple users ctrl-click) anywhere in the about:config window and select New and then Integer from the pop-up menu.
A. Enter content.switch.threshold in the New integer value pop-up window and click OK.
B. You will be prompted to enter a value. Enter 750000 and click OK.

12. NGLAYOUT INITIALPAINT DELAY
Mozilla applications render web pages incrementally, they display what’s been received
of a page before the entire page has been downloaded. Since the start of a web page
normally doesn’t have much useful information to display, Mozilla applications will wait
a short interval before first rendering a page. This preference controls that interval. Rightclick (Apple users ctrl-click) anywhere in the about:config window and select New and then Integer from the pop-up menu.
A. Enter nglayout.initialpaint.delay in the New integer value pop-up window and click OK.
B. You will be prompted to enter a value. Enter 0 and click OK. 
I hope you all like this… For more such tricks then keep visiting… If you really like these then please comment… 

IF YOU HAVE ANY QUERIES ASK ME.. :)

Cool Hack to Switch tabs in Firefox using Twisting Motion

Did you know you can switch tabs in Firefox by making a twisting motion with your fingers on a multi-touch surface? I did. Turns out I’ve been doing it for months — I thought I was late to the party and was too ashamed to mention it to anybody for fear of an epic internet ribbing (”What, you just figured that out?”). But no, apparently it was top secret and highly experimental. That was in the beta, though; it looks like the official version has reduced it to a hack. Fortunately, mastering this multi-touch-enabling technique will allow you to tweak your gestures, resulting in everlasting glory. 
Cool Hack to switch tabs in Firefox using Twisting Motion
Steps to Implement Twisting Motion Tab Switching :
  • Simply open a new tab.
  • Put “about:config” in the address bar, no quotes. It’ll ask you if you’re sure. Yes, you are. You are okay.
  • Ready? Okay, now type “twist” into the search box.
  • Double-click on the twist right, and put “Browser:NextTab” into the box, without the quotes.
  • Theeen, in twist left, put “Browser:PrevTab” without the quotes.
  • You’re done! Now, I found the gesture (it applies immediately, try putting one finger down and rotating another around it) to be a bit slow to respond, so I changed that other setting, the threshold one, from its default (25) to 10. You can mess around and figure out what’s best for you.
See, tweaking is easy! If you’re afraid you’ve ruined something, just right-click (or “context menu click”) on any box you’ve modified and hit reset.
Curiosity? Type “gesture” into the search box and try modifying a few of those settings. I don’t particularly like the twist, so I’m about to set tab switching to three-fingered swipes. Aren’t we just having so much fun?
If you have any queries ask me in form of comments. Enjoy!

Boost Mozilla Firefox Download Speed

1. Click To Begin 2. Download App 3. Increase Download Speed & Enjoy!
Most internet surfers use download managers to handle their bulk and massive downloads but sometimes these software may take up more resources than expected.

DownThemAll Firefox Extension

Here is a download manager, a Firefox extension that don’t takes much computer resources and also boost your download speed by 400%DownThemAll. DownThemAll also allows pausing and resuming downloads at anytime.

Download and Install DownThemAll

Click here to install DownThemAll extension directly to your Firefox browser. Restart browser to activate the extension.

DownThemAll Firefox Extension

Preferences

More options are available at Tools -> DownThemAll.

DownThemAll Firefox Extension

Here’s a quick preview of what you can customize with DownThemAll.

DownThemAll Firefox Extension

Perform Download

Find something to download, upon clicking on download you will be greet with this screen. Select DownThemAll!

DownThemAll Firefox Extension

Browse to your destination and hit Start to download now, or Queue to allow other downloads to finish.

DownThemAll Firefox Extension

Here’s where you control your downloads. Resume, pause and cancel are available.

DownThemAll Firefox Extension

Verdict

Here’s some reason why you should use DownThemAll

  • Firefox extension, its light.
  • Boost download speed by 400 %
  • Simple interface with options like Pause, Resume and Cancel
  • Prioritizing downloads option available
  • Option to download current viewing website in Firefox
  • Download filtering available

DownThemAll is a Firefox Extention and requires installtion of Mozilla Firefox browser.

How to speed up mozilla firefox working tricks

If you’ve been using Firefox for a long time, you may have noticed it getting slower as time passed. Maybe it takes a few seconds to start up or takes a bit longer loading webpages. You might start noticing that it takes a second or so to switch between tabs or that the menu option doesn’t pop up instantly.
If your installation of Firefox runs slow or freezes more than you’d care for, there are a lot of different ways to speed things up a bit. In this article, I’m going to go through all the tips and tricks I’ve learned over the years to keep Firefox fast and efficient. Depending on your operating system and system configuration, some tweaks might give you more of a boost than others.
Note that some tweaks require changing the browser settings in about:config. If you don’t know what I’m talking about, read my previous post on backing up and modifying the about:config configuration in Firefox.

Enable HTTP Cache

browser cache backend
There is a new HTTP cache option that can be enabled in Firefox, which will help reduce UI glitches and various other browser crashes. Open about:config and search for the following entry:

browser.cache.use_new_backend

Double-click on it and change the value from 0 to 1. You can then simply close the about:config tab and continue browsing. There is no need to restart the browser or computer, etc. The new cache will be enabled and you should get a speed boost and a smoother browsing experience.

Refresh Firefox

Firefox has a really cool feature that basically performs an automatic tune up on your Firefox installation. However, you only want to do this after you understand exactly what it does. Firstly, it will keep your browsing history, bookmarks, passwords, cookies, website auto-fill info and personal dictionary.
It will delete extensions and themes, website permissions, added search engines, download history, security settings, plugin settings, toolbar customizations, user styles and social feature. To get to it, you have to type in about:support in the address bar.
firefox tuneup
Click on the Refresh Firefox button at the top right to get started. I have used this feature a several times and it works great. It does take a bit of time reinstalling a few add-ons, but I’ve found that it helps me get rid of the add-ons I never used in the first place.

Enable Safe Mode

Firefox has a nice feature called Safe mode that disables extensions and themes in order to determine whether an extension is causing problems. Since Firefox is all about extensions, you’ll definitely run into some with poorly written code that can cause a lot of grief.
If you find that browsing in safe mode is super fast compared to normal browsing, then you can almost guarantee that it’s an extension causing the slowdown. You can restart Firefox in safe mode by clicking on the menu icon and then clicking on the help icon.
firefox help button
Now choose Restart with Add-ons Disabled to get into safe mode.
restart addons disabled
Safe mode will also turn off hardware acceleration and will reset toolbar and button customizations. Everything will go back to normal when you restart Firefox normally so don’t think you’ve lost any customizations you might have made.
Also, when you restart, it’ll ask you to Start in Safe Mode or Refresh Firefox, which is the the other tip I already mentioned above.
safe mode firefox
It’s best to disable all add-ons and then enable them one by one to see which one is causing Firefox to slow down, freeze or crash. You can see all the add-ons and plugins by clicking on the Firefox menu and clicking on Add-ons.
firefox plugins addons
The more add-ons and plugins you disable or delete, the faster Firefox will run. Some plugins will be set to Ask to Activate, which is ok. You want to check all the ones that are set to Always Activate and see which ones can be switched to Ask to Activate.

Minimize Memory Usage

Firefox has quite a few of these built-in performance tricks and another one is to minimize the memory usage. Go ahead and type in about:memory into the address bar and you can get detailed memory usage information about Firefox.
ff minimize memory usage
You’ll see a button under Free Memory called Minimize memory usage. Click on that and it will try to free up memory immediately and therefore make Firefox run faster. This is a good option to use if you had a bunch of tabs open in Firefox and you recently closed out a lot of them. Any memory being previously held by those tabs and still being used by Firefox will be freed.

Clear Cache

Another easy way to make Firefox faster is to periodically clear the cache. By default, Firefox will cache the contents of most websites you visit, so that they load faster when you visit them again. In the short term, this works well and does speed up browsing, however, once the cache becomes very large, it can start to slow things down.
If you click on the Firefox menu, click Options and then click on Advanced, you’ll see a Network tab that lets you clear the cache.
clear cache firefox
I don’t suggest clearing the cache very often, as that will slow down browsing. The best thing to do is to check every few months or to check the Override automatic cache management box and set the value depending on what type of hard drive you have. Since this cache is accessed via disk, it can be pretty slow if you have a slow hard drive.
However, if you have an extremely fast SSD drive, then using the cache can be more beneficial. So keep it small (<250 MB) if you hard drive is slow and leave it alone if you have a very fast hard disk.

Firefox Pipelining

If you have used Firefox for a long time, you have probably come across this hack on many blogs. Pipelining is a feature that basically lets Firefox open multiple connections to a server, theoretically loading pages faster. I’ve had mixed results with this setting, so it’s best to test it yourself first to see whether it’s worth keeping enabled.
There are different views on what value should be set for the max number of connections, but the consensus from most diehard Firefox fans is 8. In order to enable pipelining, go to about:config and type in network.http.pipe in the filter box and you’ll see several settings.
network http pipelining
The values you need to change are shown in the image above. I have also listed them below if it’s not clear.

network.http.pipelining – true
network.http.pipelining.aggressive – true
network.http.pipelining.maxrequests – 8
network.http.pipelining.ssl – true

Other Settings

There are a couple of more obscure settings that could possibly speed up your Firefox browsing, but results are not guaranteed. It’s best to test these and see if there is any noticeable difference.

network.dns.disableIPv6 – true
browser.tabs.animate – false
browser.display.show_image_placeholders – false

Hopefully, your installation of Firefox is running a bit faster. I don’t recommend using add-ons like FasterFox because they only change the settings we have talked about above and adding more add-ons to speed up Firefox just doesn’t make any sense. If you have your own tip for speeding up Firefox, let us know in the comments. Enjoy!

How to speed up Google Chrome

Step 1: Access Chrome’s “Secret” Settings

Chrome allows you to use unofficial browser features called “flags” while they are being tested or are generally unstable. These features are strictly experimental and may break or disappear at any time. In other words, take advantage of them while you can.
To access these secret settings, simply enter chrome://flags into your address bar, aka the omnibox, which we’ve hacked a couple times over the last week to make a tab-based text editor and speed up our Gmailing. Hit the Enter key, and you will be brought to the flags page and shown a short warning.

It’s okay. These features can all be disabled later if you notice any glitches.

Step 2: To Make Things Simple, Open “Find…”

These flags aren’t very organized, so to save you from scrolling up and down all day, hit Cmd+F (Mac) or Ctrl+F (Windows), or click the three-line overflow menu button in the upper-right and select “Find…”.

Step 3: Pick & Choose Your Chrome Speed Hacks

Now, below are ten different settings you can mess with in Google Chrome, but you don’t need to enable all of them. Pick and choose the ones you want, and find the combination that works best with your workflow. Some things may not apply to your particular browsing game.

Speed Tip #1: Set “Maximum Tiles” to 512

The first feature we’re going to change is the number of “maximum tiles for interest area.” Basically, this feature will increase the RAM that Chrome is allowed to use, and should take any little glitch out of your browsing experience.
In the search bar that you just opened in Step 2, type Maximum Tiles and hit Enter. Once you’re brought to the Maximum Tiles row, click the drop-down menu and change Default to 512.

Speed Tip #2: Change the Number of Raster Threads to 4

Tired of slow loading image? This modification will change the rendering speed of images in Chrome. Search for Number of Raster, and change the number of raster threads to 4.

Speed Tip #3: Enable SPDY/4

This modification will speed up page loading by making web transactions quicker. Search for Enable SPDY, then click the little blue Enable link in the Enable SPDY row; its color should change from light grey to white and the blue link should now say “Disable.”

Speed Tip #4: Enable Offline Cache Mode

For moments where internet connectivity is briefly interrupted, you can allow Chrome to load cached versions of webpages. Search for Enable Chrome and click the Enable link in the Offline Cache Mode row.

Speed Tip #5: Enable Experimental Canvas Features

This modification allows Chrome to utilize opaque canvases to increase loading times and boost performance. Search for Enable Experimental Canvas and click Enable in the Experimental Canvas row.

Speed Tip #6: Enable Experimental Websocket Implementation

This feature provides a different way to deal with web traffic communication. Search for Experimental Websocket and click Enable.

Speed Tip #7: Enable Touch Events

Chrome isn’t so hot on touchscreens. If you’re using an iPad, Microsoft Surface, or some other touchscreen computer, this will dramatically improve Chrome’s performance. Search for Touch Events and select Enable.

Speed Tip #8: Enable Accelerated Overflow Scroll

This will provide a better scrolling experience on particularly long pages. It works by compiling content into a single layer when it would otherwise be presented to you as in an overflow. Search for Accelerated Overflow and change to Enable.

Speed Tip #9: Enable Fast Tab/Window Close

If you can’t close a window or tab fast enough, try enabling the Fast Tab flag. This will get content out of your face faster than ever by running Chrome’s JavsaScript handler independent of the graphical user interface (GUI). Search for Enable Fast Tab and select Enable.

Speed Tip #10: Enable Checking for Conflicts with 3rd Parties

This only works on Windows, but it’s pretty useful. There’s nothing worse than a browser crashing in the middle of something important, so this option will run a background check to warn you if software is discovered that may crash the browser. Search Conflicts with 3rd Parties and Enable it.

Step 4: Relaunch Chrome

In order for these changes to take place, you’ll need to relaunch Chrome. At the bottom of the chrome://flags page, you will notice a “Relaunch Now” button—click it, and enjoy your speedy browsing upon opening Chrome.

What speed-increasing flags do you find most useful? Share below!